Have you encountered a white screen with the error message “503 Service Unavailable” on your WordPress site? In this guide, I will show you How To Fix the WordPress 503 Service Unavailable Error?
Why Does WordPress 503 Service Unavailable Happen?
There are many reasons for this error. We will explain all the reasons one by one and provide solutions for 503 Service Unavailable errors.
How To Fix WordPress 503 Service Unavailable Error?
WordPress Plugin errors
If you’re getting the WordPress 503 error after installing or updating a WordPress plugin, you’ve found the culprit. To fix the problem, delete the plugin you recently installed.
However, if you do not know which plugin is causing the 503 error, you should deactivate all the plugins and then activate them one by one to get to the root of the problem.
How to Disabling All WordPress Plugins (from Cpanel)?
You can deactivate your WordPress plugins via File Manager in your hosting.
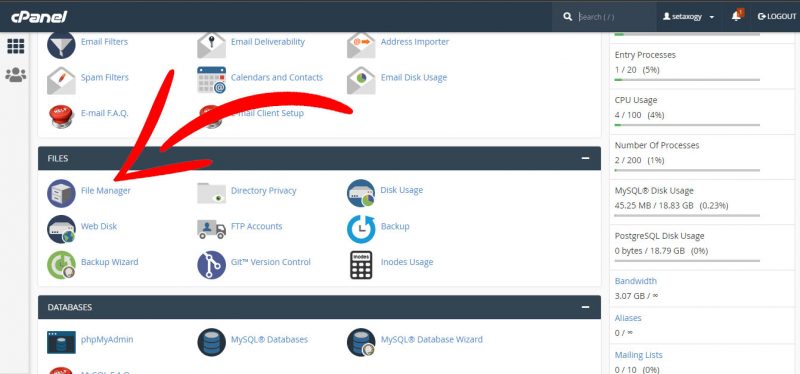
Once you logged in to your CPanel, navigate to File Manager under the Files section.
- After accessing your files manager, select public_html -> wp-content folder.
- Find the folder named plugins and right-click on it.
- Rename the folder to plugins_disable it will automatically deactivate all p

5. Rename the plugins_disable folder back to its original name plugins.
6. Refresh your WordPress site and access the wp-admin panel.
If the HTTP 503 error is solved, the source of the problem may be a specific plugin. All you have to do is find and delete the problematic plugin from your admin control panel by following the steps below:
- Navigate to your WordPress panel and go to plugins -> all plugins
- Activate all plugins one by one until you find the problematic plugin
- When you found the plugin that caused the issue simply go to your canal -> public_html -> wp-content and open the plugins folder and right-click and delete the plugin.
After following all the steps above, you should have resolved the 503 Service Unavailable error and be able to access your site again.
WordPress Theme Errors
If your plugins are not causing the 503 Service Unavailable error, your theme may be behind the problem. Especially if you are getting the HTTP error 503 after installing a new theme.
To fix this issue, switch to a default WordPress theme such as Twenty Nineteen or Twenty Twenty themes.
NOTE: Even after installing new themes, if you do not delete the WordPress default theme this will help you solve the problem
Disable WordPress Theme Using File Manager
Disabling your WordPress theme using File Manager is quite similar to disabling your plugins.
- From the Files section of your cPanel, access the File Manager -> public_html -> wp-content folder.
- Find the themes folder and rename the theme folder you are currently using. Let’s say you are using the theme named my-theme. Right-click on the folder and rename it to my-theme-off. Your website theme will automatically shift to the WordPress default theme
- After you’re done, you can refresh your site and see if it’s working.
Deactivating a WordPress Theme via phpMyAdmin
If you can’t remember the name of the theme you are using, there is another way to disable the theme. In this example we will replace the theme with the Twenty Seventeen theme:
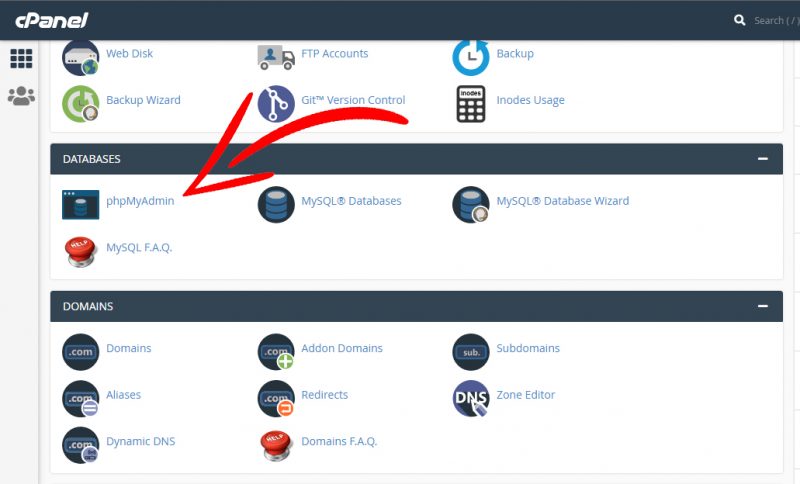
- Open your CPanel and click phpMyAdmin under the Databases section. Click Enter phpMyAdmin
2. Find the template and stylesheet values in the wp_options table.
3. The name of the theme you are currently using will be in the option_value column. Double click on the name of the theme and change it to twentyseventeen.
4. Refresh your site to see the changes you applied
NOTE: If WordPress 503 error does not occur after deactivating your current theme, try updating the theme to the latest version. Otherwise, it would be better to install a different theme.
Read our article about the best WordPress themes for woocommerce
Custom PHP Code Issue
If the 503 Service Unavailable error still persists, the problem may be caused by a faulty PHP code snippet somewhere on your website. To see if this is the case, go to debug mode on your site to find and fix the problem.
Enable WP_DEBUG (Turn on WordPress debug mode)
When you get an HTTP 503 error, you can’t log in to your admin panel most of the time, so enable WP_DEBUG mode in File Manager so you can see the error logs:
- Go to CPanel and navigate to File Manager -> public_html folder.
- Find and open the wp-config.php file.
- Scroll down /That’s all, stop editing! Add the following code before happy blogging./ line:
define('WP_DEBUG', true);
define ('WP_DEBUG_LOG', true);
define ('WP_DEBUG_DISPLAY', false);
@ini_set('display_errors', 0);
4. Click Save and Exit after you’re done.
5. After refreshing your website, messages of error logs will be displayed.
Server Related Issues
If the above methods also did not work, the problem may be with your web server. You can try these three server-side methods to resolve the WordPress 503 Service Unavailable error.
WordPress Heartbeat is a built-in API that allows your site to auto-save posts. This feature uses your server resources, but you can limit or disable it with the Heartbeat Control WordPress plugin.
Limiting WordPress Heartbeat
WordPress Heartbeat is a built-in API that allows your site to auto-save posts. This feature uses your server resources but you can limit or disable it with the Heartbeat Control WordPress plugin.
Learn how to speed up your WordPress website
To see if WordPress Heartbeat is causing the 503 Service Temporarily Unavailable error, add it to your theme’s functions.php file right after the <?PHP tag:
add_action('init', 'stop_heartbeat', 1);
function stop_heartbeat(){
wp_deregister_script('heartbeat');
}
After saving the changes, refresh your site and check if the error is gone. Don’t forget to delete the code from the functions.php file before continuing.
Limiting the Google-bot Crawl Rate
Google and other search engines will crawl your site to show your content in search results. This means they visit your website frequently, discovering new content and determining other ranking metrics.
This crawling process can strain your server resources. As a result, it can slow down your site and cause HTTP error 503.
After you integrate your site into Google Search Console, you can limit the maximum crawl rate. You can do this on the crawl rate settings page, or you can ask Google to limit your site’s crawl rate.
Increasing Server Resources
If you’re getting the 503 Service Unavailable message, check your Google Analytics account. If you are getting more traffic than usual, your server resources may not be enough.
However, if you don’t have much traffic and you’re still seeing the WordPress 503 error, your server may not have enough memory.
What is the WordPress 503 Service Unavailable Error?
A 503 Service Unavailable error means that your WordPress site is live but the server cannot be reached due to a problem. If this error is present, both the front of your site will not be visible and you will not be able to access your admin control panel.
Depending on your server configuration, the WordPress error can appear in different ways. For example, these are some of the error codes you may see:
- 503 Service Unavailable
- HTTP/1.1 Service Unavailable
- HTTP Server Error 503
- 503 Error
- HTTP 503
- HTTP Error 503
The reasons for the error can be problematic themes and plugins, custom PHP scripts error, and server-side problems.
Conclusion
The 503 Service Unavailable error is a common error where the front and back of your site do not display any content. The reason is usually WordPress plugins and themes, but this error can also occur for different reasons.
Here’s a brief rundown of how to resolve HTTP error 503:
- Deactivate your all WordPress plugins and then activate them one by one until you find the plugins that caused the issue
- Disable your current WordPress theme by reverting to a default theme
- Enabling WP_DEBUG mode
- Finding and resolving server-side issues
Good luck! If you have any questions or comments on this subject, don’t forget to share them with us in the comments section below!